Masks tutorial
Note: this tutorial is made for GM5 and certain screenshots might have changed slighlty between versions
Have you ever wondered how to improve collision checking in your game, make sure your characters don’t get stuck anymore on the map, or how to make an isometric map. The answer is that you should use masks.
What are masks
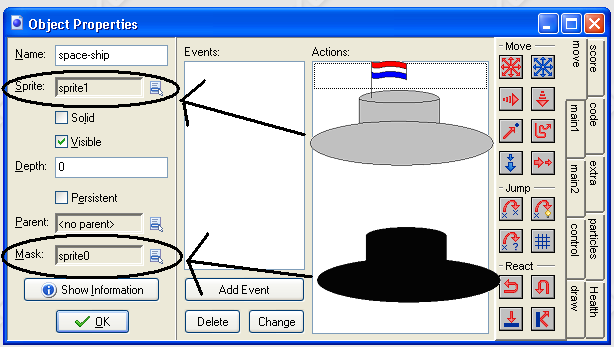
A mask is a sprite that is used by Game Maker for collision checking instead of the original sprite. This is useful for instance if you have a sprite with a lot of tentacles. For instance take this space ship:
With collision checking the flag will be counted as a part of the ship. So shooting a missile at the flag will count as hitting the ship.

Even though the shot didn’t actually destroyed the ship. It only shot of the flag of the ship and then went past the ship. So with your game you don’t want that shooting at your flag counts as destroying the ship.

To do this you can use masks. You simply make a shape in the same size as the object you make the mask for. For instance:

Now the bullet would go past the ship. Only this doesn’t look very nice in your game. Now you could add this as an invisible object to the game and make it follow the ship and make all collision checking with this new object. Luckely Game Maker has a built in system for this. These are the masks. If you add both the first image to your game and the black image to your game and set them as mentioned below:

You then will have excellent collision checking for your ship.
Animated sprites
Masks are also very useful when using animated sprites. Since the image changes every step the area the sprite takes in also changes every step. So it could be that during an animation in one frame you are walking past a wall while the next moment you are inside the wall. This makes that you suddenly stand still and are stuck in a wall. Luckily when using masks this will not happen since masks do not change for your object. It doesn’t matter which sub image is being displayed the mask always stays the same. So when using animated sprites together with complex collision checking it is always a good id�e to have a mask.
Isometric maps
If you want to make an isometric game masks are also very important.

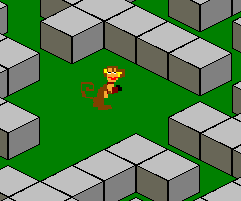
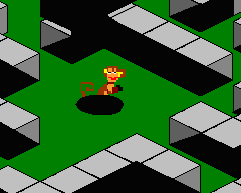
If you look at the example you see that the monkey is not capable of passing to the small parts between the walls. So the monkey can not walk around. Yet in your game you want to have that the unit can walk around through the map. Therefore we use a mask for the monkey. So we give the monkey a small mask about the size of his shadow and we also give all the walls a mask. This then will give:
�
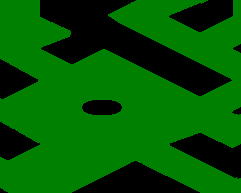
This maps looks a bit weird but if we remove all the images it will be like:

This is how the PC handles the game. It will simply use the black round image as main character and this will be used for collision checking. This while the user will only see a monkey in a maze and without seeing any of the black parts.
Final notes:
- In this tutorial I used black as color for the masks. Please note that any color can be used for masks. Just make sure you only keep one color as background color
- Within the game the masks will never be shown. When you assign a mask to an object you will at all time only see the image of the character.
- If you do not want to use masks since they require that you add an extra image to the game for every sprite that needs collision checking you can also use the bounding box in the image properties. (Open the sprite in Game Maker. Set the bounding box to manual and give the left, right, top and down coordinates of the bounding box. The mask in that case is a rectangle with the given sizes)
This tutorial has been created by
Simon Donkers
gmmentor@simondonkers.com
www.simondonkers.com

